How to live stream on AWS

Are you tired of evaluating streaming providers and always getting stymied by a critical disadvantage of some sort? Are you a fan of cloudy days? Does your risk tolerance extend to nebulous and potentially-vast cloud usage charges with practically no upper bound?

Then boy, have I got a how-to for you!

Here’s a rough picture of the setup we’ll end up with:

And here’s a textual rundown of what we’re going to need:

  • An encoder. I use OBS.
  • An AWS Elemental MediaLive instance.
  • An AWS Elemental MediaPackage instance.
  • An AWS CloudFront distribution. (MediaPackage takes care of this for us.)
  • A client-side video player. (We’ll use VideoJS.)

This guide will walk you through all of these except the first: I am going to assume you’re already familiar with OBS (or some other encoder). If not, you’ll want to find a guide and do some reading on that before you dive into this.

I currently use this setup to live stream worship services at Grace URC. We stream at 720p, 2500Kbps upload bitrate, and we have MediaLive configured to rebroadcast to YouTube Live.

One thing to note is that I’m focused on minimizing costs rather than maximizing redundancy or quality. The steps I use set up a SINGLE_PIPELINE channel in AWS rather than the STANDARD channel class most of the Amazon templates have you create. STANDARD gives you more redundancy via dual input pipelines, but I’m not equipped to take advantage of this. Besides that, if you need high-availability, you shouldn’t be learning how to do this from my walkthrough. I profess no expertise here; I’m just sharing what I’ve learned by stumbling through it.

Serious disclaimer: AWS costs money. In my experience streaming 720p to a modest audience of 60-70 viewers, you should budget something a little under $10/hour for this setup. If you forget to stop your AWS channel, it’ll continue to rack up a few bucks an hour, presumably indefinitely. I like to set up budget warnings in AWS Cost Explorer to notify me of any craziness going on.

Onward to live streaming!

Step 1: Create MediaPackage instance

MediaPackage is the part of the machine that takes the numerous streams of varying resolutions and bitrates from MediaLive and packages them all together into a single HLS manifest for clients to consume. The end result of this will be that you get a URL ending in .m3u8 which you can feed to a client player like VideoJS on your website.

  1. Go to your AWS console.
  2. In the “Find services” search box, type mediapackage and click on the MediaPackage service.
  3. Under Channels, click Create.
  4. Enter an ID you’ll remember (we’ll use this later).
  5. For Input Type, choose Apple HLS.
  6. Check the radiobutton to “Create a CloudFront distribution for this channel”. (This is technically optional, but as of this writing, network egress from CloudFront costs the same as egress from MediaPackage and the transfer from MediaPackage to CloudFront is free, so I figure why not have a CDN?)
  7. Click “Create”.

Step 2: Create MediaLive instance

  1. Go to your AWS console.
  2. In the “Find services” search box, type medialive and click on the MediaLive service.
  3. Click the orange “Create Channel” button.
  4. Find the section on the page which says “Select custom template”.

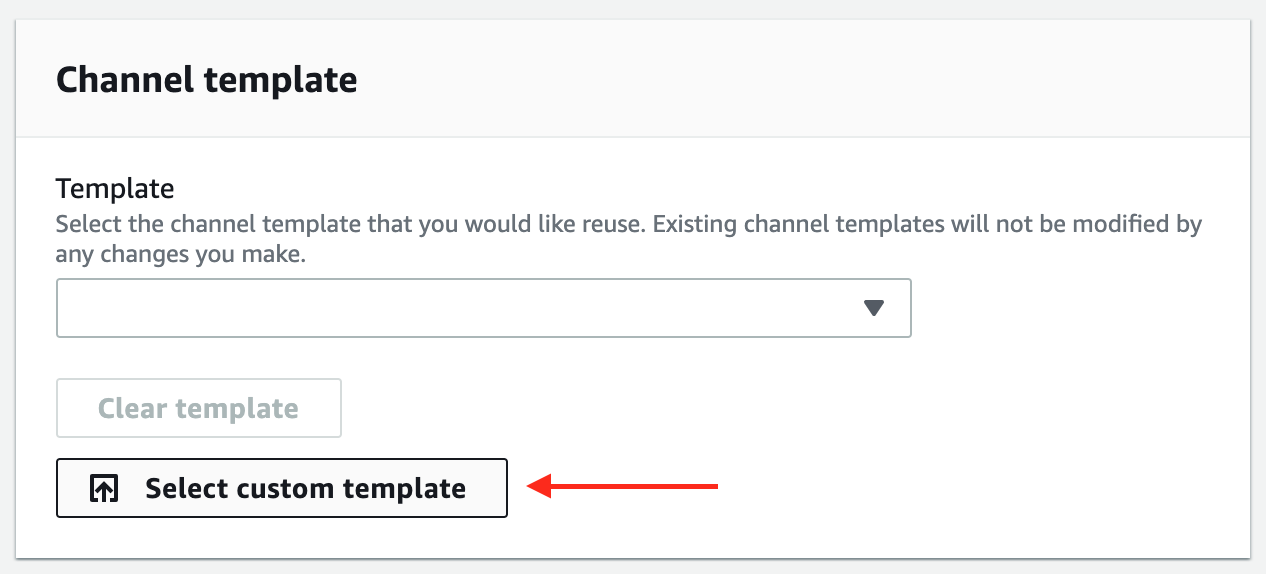
At this point, you need a template file to upload. Here’s the template I’ve been using (with a few sensitive details stripped out). You’ll need to replace YOUR-MEDIAPACKAGE-CHANNEL-ID-HERE with the MediaPackage channel ID you set above and YOUR-YOUTUBE-STREAM-KEY-HERE with the stream key for the YouTube Live stream you want to rebroadcast to. (If you don’t want to do that, you can remove the YouTube output entirely after you import the template.)

If all went well, most of the fields you need should be filled in. The output groups panel on the left should look something like this:

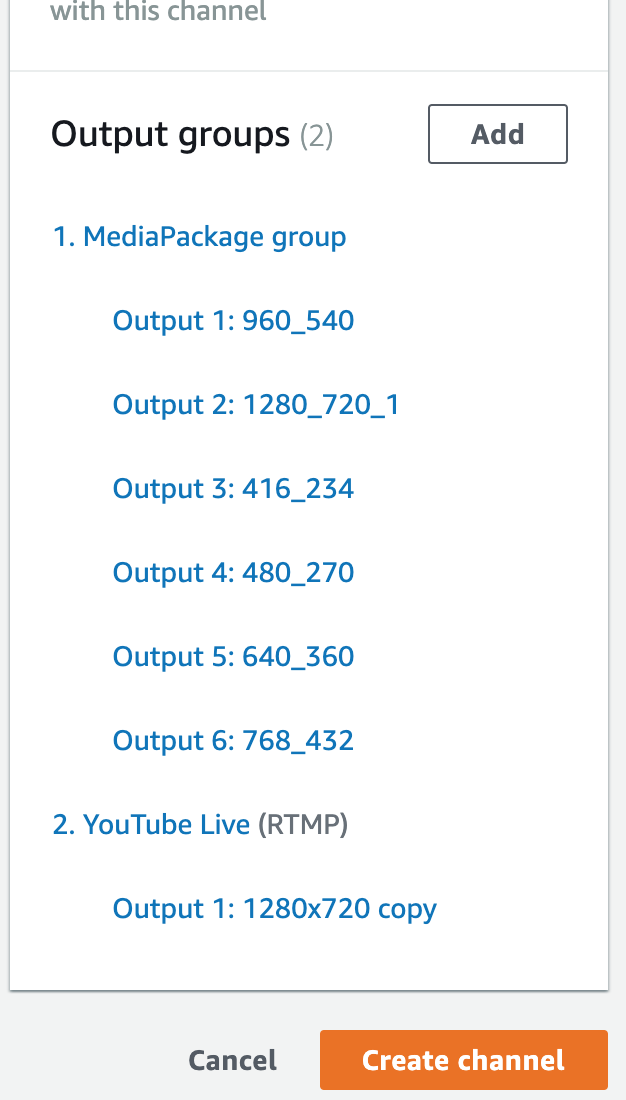
At this point, if you’re not planning to stream to YouTube Live, click the “YouTube Live (RTMP)” output and then click the Remove button in the upper right.

Now that the template is added, there are just a couple more things to do before creating the channel.

  1. Next to “Input Attachments”, click “Add”.
  2. In the upper right next to “Attach Input”, click the “Create Input” button.
  3. Enter a name for the input (I usually put “rtmp ingest” here, but this can be anything).
  4. Select “RTMP (push)” from the list.
  5. Leave “Network Mode” as “Public”.
  6. Under “Input Security Group”, select “Create”.
  7. Look up your public-facing IP address.
  8. In the “CIDR-formatted strings” box, enter your public IP address followed by /32. For example, if your IP was 1.2.3.4, you would enter 1.2.3.4/32. This is a security measure making it so only your IP address can connect to this input.
  9. Click “Create input security group”.
  10. Under “Input Destinations”, select the channel class “SINGLE_PIPELINE”.
  11. Under “Destination A”, enter an application name and instance. The application name will be appended to the RTMP server URL you’re going to put into OBS. The “application instance” is going to be the stream key you put into OBS.
  12. Click Create.
  13. Back at the channel, select the input you just created, then click “Confirm” to attach it to the channel.
  14. Scroll down to the section which says “Audio selectors” on the newly-attached input settings.
  15. Click “Add audio selector”.
  16. Give it a name (I use “default”). Leave “Selector settings” blank.
  17. On the left, click “Create Channel”.

Step 3: Start the channel

At this point, you have an input and a channel. In the MediaLive control panel, on the left if you click “Inputs”, you should see your input listed with a rtmp:// address under “Destination A” on the right. That’s the URL you’ll put into OBS as the stream URL, all except the last part (the part you entered for “application instance” – strip that off the URL and instead put that last part into “stream key” in OBS.

If you click “Channels”, you’ll see your new channel listed as Idle. To start streaming, select the channel and click “Start”. It will take a few moments to start up. Once it’s ready, after you configure OBS with the RTMP input’s stream URL, you can start streaming.

Step 4: Get the CloudFront HLS URL

Go to the AWS MediaPackage service and select your MediaPackage instance from the list (it’s probably the only one). Click on it to view the details.

In the “Endpoints” section, you should have one endpoint listed. On the right there’s a link which says “Show CloudFront URL”. Copy that URL – it’s the one we want to give VideoJS.

Step 5: Set up the VideoJS player

Now on your website you need to add the VideoJS player. Here’s a basic example:

Replace YOUR-HLS-URL-HERE.m3u8 with the CloudFront URL you copied above.

Teardown

Cloud resources cost money! Don’t forget to stop your MediaLive channel when you’re done streaming. When the channel is stopped, both it and the RTMP input each cost $0.01/hour as idle resources. For my purposes, I usually delete the input and channel since I only stream once a week. To do this, you must first stop and delete the MediaLive channel, and then delete the input (it won’t let you delete the input while it’s attached to the channel).

I leave the MediaPackage and CloudFront resources in place because they are not charged the idle fee (as of this writing).

These AWS services have a lot of configuration options I’ve left out here (and I’m not qualified to talk about most of them), but this walkthrough should get you set up with a decent 720p channel.

Creating complex shortcodes in WordPress

I occasionally dabble in custom WordPress themes on my wife’s behalf and in furtherance of her vast eBook empire. As part of her current theme, she wanted some shortcodes to do neat things like having a multi-column section of a blog post. That way, she can write:

[columns]
[column]First column here![/column]
[column]Second column here![/column]
[/columns]

instead of the actual mess of HTML and CSS required to make such magic happen. Plus, if we ever decide to change the markup we’re using to generate columns, we can just change the implementation of the shortcode instead of going and updating a whole bunch of blog posts. Cool feature!

Defining a shortcode

In your theme’s functions.php, you need to do (at minimum) two things:

  1. Create a function that replaces the shortcode with its actual content.
  2. Register your shortcode with WordPress.

This part is straightforward. Say we wanted to create a [contentbox] shortcode to automatically wrapped its contents into an <aside>. That could look something like:

We could use it this way:

[contentbox align="right"]Here's a nice right-aligned piece of content![/contentbox]

When included in a post, that would become:

<aside class='content-box right'>Here's a nice right-aligned piece of content!</aside>

(CSS to make it actually look like a box and aligned right is left as an exercise for the reader.)

The evil that lies within

There’s a problem. WordPress has an ancient, vile, and notorious function in place which is designed to make users’ lives easier and developers’ lives miserable. This function is called wpautop and I hate it passionately.

The idea behind wpautop is simple: convert all double linebreaks into paragraph elements, and tack on <br> tags to whatever’s left. This lets an average user type text into the editor and have it converted to HTML even without using WordPress’ visual editor. The problem is that wpautop doesn’t know anything about shortcodes, so if our user splits our shortcode into several lines (such as the [columns] example at the top of this post), wpautop comes through and sprays <br> tags everywhere. Incidentally, <br> stands for “break”, which is exactly what wpautop is designed to do to nice complex shortcodes.

This problem has been known for ages – it was reported at least 9 years ago as of this writing, was still allegedly being discussed by WordPress devs 7 months ago, and there is no fix. Ridiculous.

Rescuing the shortcodes

There are at least four ways to deal with the problem of wpautop murdering our shortcode content:

Option 1: Change do_shortcode filter priority

While loading a page, WordPress executes a long list of “filters”, which are just functions that operate on the post’s content. wpautop is one such filter, as is do_shortcode. The latter is what ends up calling our own custom shortcode functions, replacing the shortcodes with actual content in the post. In WordPress core, wpautop runs at priority 10 and do_shortcode runs after that, at 11. So one way to thwart wpautop is to change do_shortcode‘s priority to 9, meaning our shortcodes will be resolved first and hopefully wpautop won’t mangle the output too badly.

This isn’t a great solution because it can potentially break all kinds of other themes or plugins (which might rely on WordPress’ default filter order) in subtle ways. Until today, I was using this approach for my wife’s site theme, but then we started switching her shopping cart to WooCommerce and discovered that my hack broke the text on the “proceed to checkout” button (because wpautop vomited a <br> randomly into the button text).

So if you take this route, expect occasional oddities with other plugins. This is not a well-behaved solution.

Option 2: Disable wpautop entirely

I love this option because I hate wpautop. However, this will likely break even more themes/plugins than option 1, and also users may not get the expected results if they’re composing posts in the text editor without using a sensible text parser like Markdown. Still, if you want to do it, just put these two lines into functions.php:

remove_filter( ‘the_content’, ‘wpautop’ );
remove_filter( ‘the_excerpt’, ‘wpautop’ );

Option 3: Disable wpautop on a post-by-post basis

You can install a plugin to disable wpautop only on certain posts–in our case, the ones with shortcodes on it.

I like how the plugin description explains its existence by saying “Back in the day, when the wpautop filter was really sucky…” What, you mean like yesterday?

Option 4: Hide the shortcodes behind a false bookcase

Like squirreling away guns or hiding Jews from the Nazis, this approach pretends that shortcodes don’t exist until after wpautop runs. It’s the most complicated, but it’s probably also the best because it lets wpautop commit whatever debauchery it wants on the post and then puts our precious shortcodes back in place unmolested. There are two steps:

  1. Register a filter before wpautop to search the post content for any shortcodes and replace them with random strings.
  2. Register a filter after wpautop but before do_shortcode to switch out the random strings for the original shortcode text.

Easier said than done, because finding complex shortcodes is no walk in the park. Fortunately, I’ve done the hard work for you!

When included in your functions.php file, the above code will:

  1. Search for any shortcodes in your post/page content.
  2. Once a shortcode opening tag is found, attempt to locate its corresponding closing tag.
  3. Replace the entire shortcode contents in the post with a random string.
  4. After wpautop has run, replace the random strings with the original shortcode markup.

After that, do_shortcode should run and evaluate your shortcodes normally.

Plex: Rename a TV Show Season

I’ve recently been working on digitizing our media collection using Plex. For the most part, the system works amazingly smoothly, provided you closely follow the naming conventions Plex expects, thus enabling it to find metadata about each file from the various online sources.

Problems arise when you want to add your own home media, or in my case, adding school media such as Math-U-See video lessons. Plex treats these as “TV shows” and it names TV show seasons using just the number, e.g. “Season 1”, “Season 2”, etc. This is not very helpful for identifying Math-U-See lessons, since they are named “Alpha”, “Beta”, etc.

Plex has a built-in editor for renaming the show itself, but inexplicably it does not provide an editor to change the name of a season. However, there is a way to do this. By adding an HTML input to the screen while editing a season, it turns out Plex saves the value and renames the season. Hooray! Just copy the following JavaScript and save it as a bookmarklet in your browser (in Chrome, go to the Bookmark Manager, Organize, Add Page, name it whatever you want, and paste the below code into the location box):

Then, in Plex, navigate to the season you want to rename, click the edit button, and click the bookmarklet. It will prompt you for a name. Enter whatever you like, click OK, then click Save Changes, and you’re done!

plex_rename_tv_show_season

Force MFC-8890DW to Keep Printing

Today we will be learning how to use a Magical Toner-Generating Device (MTGD) to enable your Brother black-and-white laser printer (specifically, model MFC-8890DW) to print even when it is out of toner! We’ll use this Weird Trick Invented by a Random Guy on the Internet! Printer Manufacturers Hate Him! But that’s okay, because The Feeling is Mutual!

(Full disclosure: I did not invent this trick. But I like to pretend that I did, because it makes me feel smarter and more nefarious.)

My Brother MFC-8890DW has been complaining of low toner for a while now, but I have been ignoring it because there is no appreciable difference in the documents it is printing. Then last week, right after printing a perfectly crisp page of text, the printer announced that I needed to Replace Toner and petulantly refused to print me more documents until I met its extortionate demands. However, based on my past experience with laser printers, I am under no illusions that they suddenly go from “prints just fine” to “completely out of toner”, and based on my experience with printer manufacturers, I am completely willing to believe that they will disable your printer and hold it hostage as a sort of scheme to force you into buying more printer supplies.

The general approach here is going to be to install a Magical Toner-Generating Device (MTGD). It works by absorbing the lies spewed forth by printer manufacturers and condensing them into a black powdery substances which can then be applied to paper the same as regular toner. Quality may vary, but so far I have found the results to be satisfactory. The device itself looks like this:

electrical_tape

Thus, we come to the nefarious directions for circumventing the printer’s extortion scheme. I like to think of this as the hostage (that’s me) escaping from the extortionist (that’s the printer), subduing it (after a brief scuffle), blindfolding it, putting it on the edge of a cliff, and holding a cattle prod to its back while shouting “Print, curse you! PRINT!” This process may violate the DMCA and/or other local laws, it may void your warranty, and it may result in an immense sensation of personal satisfaction. Use at your own risk.

  1. Open the front cover.
  2. Pull out the toner cartridge.
  3. On the right side of the cartridge, locate the little clear, round “observation window”.
  4. Apply the MTGD. That is to say, cover this window with black electrical tape.
  5. Put the cartridge back in and close the cover.

Here are two helpful illustrations of this complex technical procedure:

Toner cartridge: Before!

Toner cartridge: After!

In my case, this operation convinced the printer to merrily continue on its way, printing completely acceptable pages. (Since the printer claimed the toner was empty, and since we know a printer would never lie about its toner levels, I like to think it’s now using magic toner.)

I need to go do something else now, as I just heard a strange noise and the printer seems to have shifted position overnight, inching a little closer to my office chair. This won’t take long.