Four months ago, when it came to live streaming events, I knew about Twitch.tv and YouTube Live, and that was about it. It was about that time that my church, which is not exactly multimedia-savvy, suddenly had the need to live stream services because we were no longer allowed to meet in person due to the threat of COVID-19.
Among these two providers I was familiar with, when it came to streaming Sunday worship services, Twitch.tv was automatically disqualified for what are hopefully obvious reasons. YouTube Live was an option (and many churches use it), but I preferred to avoid it because of the automatic video/channel recommendations that we, as the streamer, have no control over.
And so my quest began, the quest for the perfect streaming platform.
Open Streaming Platform
I started the adventure off right by setting up a VPS at DigitalOcean and installing Open Streaming Platform. OSP is more of a DIY streaming provider, designed as a platform where you can host multiple channels with user accounts, chat, VODs, and the works all built in.
This solution actually worked pretty well. OSP supports transcoding the stream server-side into multiple bitrates for different client network speeds, though this does take significant CPU power. The main limitation I ran into with OSP was not related to the software at all but rather outbound network throughput on the server side. This being very early in my streaming adventures, I hadn’t done the proper math yet and realized that 90 viewers * 3500Kbps == 315Mbps, which is above what a DigitalOcean VPS is designed to sustain. This led to some users reporting choppy streams. (After I realized what was going on, I did some searching and discovered that DigitalOcean expects you to limit sustained network use to 300Mbps. Oops!)
If you have a high-throughput connection capable of sustaining your audience, OSP works well and isn’t too hard to set up, assuming you have basic familiarity with Linux servers and nginx configuration. Even though in retrospect I think I could have streamed at lower bitrates and sneaked under the bandwidth limitations (we currently stream at 2500Kbps), it would have remained close.
Pros
- It’s free (besides server costs and your time)
- It has a nice admin UI
- There are a wide variety of features built-in
- The player works well
Cons
- OSP completely froze once, fortunately just after the stream content ended. It required a server reboot to get running again. I’m not sure what happened.
- You need a server with high network throughput to stream to many users. Renting a server built for this sort of thing can easily run into the hundreds of dollars a month.
Boxcast
The next streaming provider I tried was Boxcast. They offered a two-week trial, so I ended up using Boxcast for four total services. In all but one, it worked flawlessly, but in the last service, about 10 minutes before the end the RTMP ingest server started choking. We went from a solid 2500Kbps upload to 500-800Kbps, which was enough degradation for people to start getting choppy streams again. Immediately after the service ended, I closed down the stream and did a speed test as well as a brief test using YouTube Live, all of which worked flawlessly. So I think something happened either on Boxcast’s ingest server or on the network between me and it.
Normally I would have followed up with Boxcast’s support (which appears to be excellent), but I didn’t because the other major problem with Boxcast is their annual commitment. My church will probably keep on streaming services after the COVID lockdowns end, but it’s probably going to be to only a handful of users. An annual commitment of $100 a month is steep for a small church to stream to just a few users.
Pros
- Clean interface, easy to set up events
- Excellent player (appears to use the open source VideoJS player)
- Also offers out-of-the-box streaming with custom encoder hardware, if you’re big enough to want that sort of thing
Cons
- The streaming admin interface made me slightly uncomfortable. There’s a mysterious delay when you start an event (I now suspect this is while they spin up cloud resources in the background). Also, the interface left some questions in my mind about what would happen if my internet connection dropped and then I tried to reconnect – would the event automatically end? Overall, I would have liked more “manual control” over stream start, end, and the corresponding embed URL.
- The ingest server had that spot of bad performance. It didn’t die completely, but upload was slow. And related to the above issue, I wasn’t sure if I could stop and restart the event to try to fix it without all my users having to refresh the page (or me having to embed a new player URL).
Despite the cons, I probably would have signed up for Boxcast if I could have justified the cost and commitment.
YouTube Live
So how about that YouTube Live! Wanting a solution that would “just work” and get our church through this turbulent streaming adventure, I decided to try a couple of services with YouTube Live and just put up with the potential for ads and channel recommendations. (Maybe just channel recommendations. I’m still not sure whether YouTube will ever insert pre-roll or post-roll ads without your permission, and that despite searching all over for the answer.)
YouTube Live’s admin interface is far and away the best of the options I tried. It’s easy to set up a stream, and you have manual control over whether to start and stop it. The player is best-in-class. Right?
For some reason, numerous congregants on various browsers reported serious audio sync issues. (We’re talking audio being out of sync with video by up to 10 seconds.) This persisted for them even through reloading the page. I’m reasonably sure it wasn’t a problem on my end, because it worked fine for lots of other users, and the recording later on YouTube was all in sync. I have no idea what went wrong here, but it happened two weeks in a row for these folks. And here I thought YouTube was the gold standard for video players.
Pros
- It’s “free”, if you don’t value your (and your viewers’) personal data
- The admin interface is excellent
Cons
- Bizarre audio sync issue which is literally impossible to troubleshoot because Google support doesn’t exist unless you are either a famous social media celebrity or paying them five figures a month (and sometimes not even then)
- Post-roll channel recommendations tend to reduce the degree of reverence which ought to go with a worship service to the Triune God
- There’s literally no way to pay money to get a white-label experience
Vimeo
A while back, Vimeo bought out Livestream to add to its video platform. At $75/month, the Premium membership includes this livestream functionality, so I gave that a try too.
Vimeo’s admin interface is just okay. Live streaming is clearly still the redheaded stepchild in the Vimeo ecosystem; parts of the admin UI feel tacked-on and it’s missing some customization functionality that normal videos have.
Furthermore, Vimeo’s player is straight up terrible. In my own testing, the player would just randomly change quality levels every 10 seconds or so, causing a noticeable break (or record-skip repeat) in the video every time. This went away for me if I manually set the quality level to the highest option, but your average user is not going to do that.
Vimeo would be better off if they just threw away their player code entirely and used vanilla VideoJS instead. In fact, that’s exactly what I would have done if Vimeo live streaming provided the option of a static HLS URL for your streams – which they don’t, unless you are an Enterprise user (“How much does it cost? Well, how much do you have?”) and willing to use an API to get at it. No thanks.
Pros
- Only $75/month (does require annual commitment, though)
- Vimeo does move bits from your machine to viewers’ machines, if the viewer can manage to get the Vimeo player to work
Cons
- Vimeo player is absolute pants
- No option for third-party live stream players if you’re only a “Premium” member
StreamSpot
At this point in the story, we are approximately two months into COVIDmania 2020 and I am getting tired of changing streaming providers every couple of weeks. The thought crosses my mind that Amazon Prime Video sure does a lot of video streaming; surely somewhere in Amazon’s behemoth cloud ecosystem there might be something a software developer like me could cobble together? I hunt around and found some buzzy sorts of words like OTT, Elemental MediaLive, MediaStore, and MediaPackage. I see cost estimates of $700+ per hour for channels serving thousands of users but acknowledgements that costs are “very hard to predict” and can vary greatly based on nebulous things like CloudFront cache hit rates.
Then I find an article somewhere in the bowels of AWS bloggery (I can’t even find it again, sorry) which lists some partners offering live stream services built on the AWS platform. StreamSpot was one.
Right off the bat I’m charmed by StreamSpot’s silly little loading indicator for their website. It took me right back to 2001 with sites doing Flash-based animated “loading” bars. Touching.
This bit of nostalgia aside, I liked the look of StreamSpot’s offering. It was $80 a month, no long term commitment, for 100200 (for the COVIDs!) concurrent viewers. Additional viewers would cost something like $20/100 (don’t quote me) if you exceeded the limit. Interesting pricing model.
Another large benefit is they provide that static HLS endpoint URL, so you don’t have to use their player. This is actually a vital part of their offering, because I could not get their player to work under any circumstances.
Using VideoJS as my player, I got a test stream up and running. I had some issues doing so, because I was still so new to the nuts and bolts of video transport I didn’t know how to load the URL correctly, and I reloaded the player a bunch of times with trial-and-error initialization. Finally, though, it worked. I went back to the StreamSpot admin dashboard.
23 concurrent viewers?
My eyes narrowed. I’m the only one who knows about this test stream at this randomly-generated URL. I close things down and a few minutes later the viewer count goes to 0. I start up a new test stream and, thoroughly suspicious now, I open my player page and refresh the page a dozen or so times.
16 viewers.
And so I closed the browser and that is the last time I set eyes on the StreamSpot admin dashboard. Because what I’ve been telling all my viewers all along is that if something goes wrong with the stream, just refresh the page. If I have a hundred people each refresh the page a couple of times, I’m out 20 or 40 bucks.
Now, here I have to confess something in my nature that I’m not completely proud of: earning my respect is difficult, and losing my respect is both easy and often irrevocable.
For background, I need to point out that the StreamSpot account creation process explicitly asked for my time zone, and I told it the truth. (It’s the only provider who asked for my timezone, as far as I recall.) I did all this experimentation late at night, and by the end of the night had determined the concurrent user counter was going to be a problem for me. However, I was willing to talk to a sales rep, because maybe they only look at average concurrent users or something to smooth out the inadvertent spikes.
On the second day of my StreamSpot trial, at 6:30am, my phone started ringing on the nightstand next to my bed. (I mute all notifications except phone calls at night, just in case somebody actually needs to get through to me in an emergency.) Because of the late night testing, I was not awake until the ringing started. Caller ID said it was somebody from Clinton, LA. I don’t know anybody from Clinton, LA. Dashed spammers. I rolled over and went back to sleep.
Later I discovered my caller from Clinton, LA, left me a voicemail. He was a cheery-sounding chap named “George” (not really) who spent 45 seconds explaining how happy he would be to talk to me about my StreamSpot trial. And just like that, in a flash I knew that concurrent viewer counting logic didn’t matter, because there was no way I was going to pay money to a company who asked me for my timezone and then used it to wake me up in bed with a sales call.
In the voicemail, George promised to email me, but he never did, so I never bothered to offer him a clue. A month later, the day after my trial expired, George called me again, this time at 7:30am. But by that time I no longer had my script memorized to give him a one-sided chewing out for dragging Pacific timezone people out of bed, so instead I ghosted him.
Pros
- It’s a thin wrapper around AWS Elemental streaming services
- Static HLS URL for your channel, giving you flexibility to use your own player
Cons
- Questionable “concurrent user” pricing model
- Sales calls first thing in the morning are obnoxious and rude
AWS Elemental MediaLive
By now, the little bits of streaming knowledge which had slowly been trickling into my brain over the past several months had built up sufficient momentum that I felt able to tackle the AWS beast. I was tired of dealing with the various streaming provider admin UIs which are probably all just papered over the top of AWS anyway. Might as well go straight to the source!
Setting up the necessary AWS resources to live stream is no simple matter, which is doubtless why businesses like StreamSpot exist. However, if you’re moderately technical, it can be done. I intend to write another, separate blog post with the steps I use to set up our streaming infrastructure each week. (Actually, I intended that to be this blog post, but then I felt like writing some background so people wouldn’t call me crazy for immediately jumping to AWS. You’re still welcome to call me crazy.)
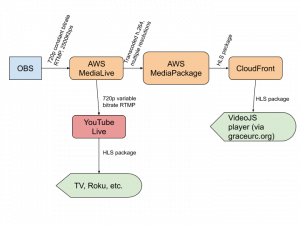
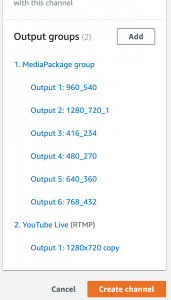
There are approximately 4.7 thousand settings and parameters to configure in AWS, and it feels like any one misstep might bankrupt me with unexpected cloud charges (which is why I have my AWS charges go to a debit card attached to an account with a strictly limited number of dollars in it). In the end, I have one Elemental MediaLive instance with an RTMP push ingest attached to it, and that does the stream transcoding into different resolutions and bitrates. It also forwards the stream on over to YouTube Live, which some of my viewers still prefer for smart TVs, Rokus, and the like. MediaLive pushes bits over to AWS MediaPackage, which puts together an HLS stream and shoves it onto a CloudFront CDN distribution. The CloudFront URL is what I plug into my VideoJS player, and everything works flawlessly.
Pros
- Total control over the streaming infrastructure, no questionable UIs or abstractions covering things up
- Static CloudFront URL for the video player
- Can re-stream to YouTube Live for just the cost of bandwidth (and I’m able to use variable bitrates, so AWS only sends the bits strictly necessary to show the stream)
Cons
- A real inconvenience to set up each week (unless you’re willing to accept $0.02/hour of idle resource charges throughout the week)
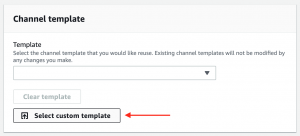
- Tough to figure out how to get set up the first time (though afterward you can reuse a template to set most of the config options automatically)
- AWS cost opacity always makes me nervous
Conclusion
I’ve been happy with AWS and VideoJS thus far. We stream at 2500Kbps source bitrate (720p, 30fps) and we transcode that to about 6 different resolutions/bitrates. That plus forwarding to YouTube, with around 60-70 viewers for approximately 2-3 hours each Sunday, costs about $12 per week on AWS – well below any of the other options.
I hope this review has been helpful. Next time, we dive into what’s required to get this AWS setup running.


