Are you tired of evaluating streaming providers and always getting stymied by a critical disadvantage of some sort? Are you a fan of cloudy days? Does your risk tolerance extend to nebulous and potentially-vast cloud usage charges with practically no upper bound?
Then boy, have I got a how-to for you!
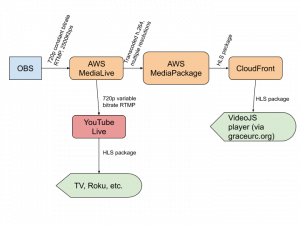
Here’s a rough picture of the setup we’ll end up with:
And here’s a textual rundown of what we’re going to need:
- An encoder. I use OBS.
- An AWS Elemental MediaLive instance.
- An AWS Elemental MediaPackage instance.
- An AWS CloudFront distribution. (MediaPackage takes care of this for us.)
- A client-side video player. (We’ll use VideoJS.)
This guide will walk you through all of these except the first: I am going to assume you’re already familiar with OBS (or some other encoder). If not, you’ll want to find a guide and do some reading on that before you dive into this.
I currently use this setup to live stream worship services at Grace URC. We stream at 720p, 2500Kbps upload bitrate, and we have MediaLive configured to rebroadcast to YouTube Live.
One thing to note is that I’m focused on minimizing costs rather than maximizing redundancy or quality. The steps I use set up a SINGLE_PIPELINE channel in AWS rather than the STANDARD channel class most of the Amazon templates have you create. STANDARD gives you more redundancy via dual input pipelines, but I’m not equipped to take advantage of this. Besides that, if you need high-availability, you shouldn’t be learning how to do this from my walkthrough. I profess no expertise here; I’m just sharing what I’ve learned by stumbling through it.
Serious disclaimer: AWS costs money. In my experience streaming 720p to a modest audience of 60-70 viewers, you should budget something a little under $10/hour for this setup. If you forget to stop your AWS channel, it’ll continue to rack up a few bucks an hour, presumably indefinitely. I like to set up budget warnings in AWS Cost Explorer to notify me of any craziness going on.
Onward to live streaming!
Step 1: Create MediaPackage instance
MediaPackage is the part of the machine that takes the numerous streams of varying resolutions and bitrates from MediaLive and packages them all together into a single HLS manifest for clients to consume. The end result of this will be that you get a URL ending in .m3u8 which you can feed to a client player like VideoJS on your website.
- Go to your AWS console.
- In the “Find services” search box, type
mediapackageand click on the MediaPackage service. - Under Channels, click Create.
- Enter an ID you’ll remember (we’ll use this later).
- For Input Type, choose Apple HLS.
- Check the radiobutton to “Create a CloudFront distribution for this channel”. (This is technically optional, but as of this writing, network egress from CloudFront costs the same as egress from MediaPackage and the transfer from MediaPackage to CloudFront is free, so I figure why not have a CDN?)
- Click “Create”.
Step 2: Create MediaLive instance
- Go to your AWS console.
- In the “Find services” search box, type
medialiveand click on the MediaLive service. - Click the orange “Create Channel” button.
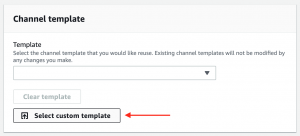
- Find the section on the page which says “Select custom template”.
At this point, you need a template file to upload. Here’s the template I’ve been using (with a few sensitive details stripped out). You’ll need to replace YOUR-MEDIAPACKAGE-CHANNEL-ID-HERE with the MediaPackage channel ID you set above and YOUR-YOUTUBE-STREAM-KEY-HERE with the stream key for the YouTube Live stream you want to rebroadcast to. (If you don’t want to do that, you can remove the YouTube output entirely after you import the template.)
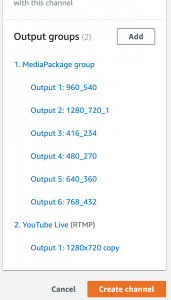
If all went well, most of the fields you need should be filled in. The output groups panel on the left should look something like this:
At this point, if you’re not planning to stream to YouTube Live, click the “YouTube Live (RTMP)” output and then click the Remove button in the upper right.
Now that the template is added, there are just a couple more things to do before creating the channel.
- Next to “Input Attachments”, click “Add”.
- In the upper right next to “Attach Input”, click the “Create Input” button.
- Enter a name for the input (I usually put “rtmp ingest” here, but this can be anything).
- Select “RTMP (push)” from the list.
- Leave “Network Mode” as “Public”.
- Under “Input Security Group”, select “Create”.
- Look up your public-facing IP address.
- In the “CIDR-formatted strings” box, enter your public IP address followed by
/32. For example, if your IP was 1.2.3.4, you would enter1.2.3.4/32. This is a security measure making it so only your IP address can connect to this input. - Click “Create input security group”.
- Under “Input Destinations”, select the channel class “SINGLE_PIPELINE”.
- Under “Destination A”, enter an application name and instance. The application name will be appended to the RTMP server URL you’re going to put into OBS. The “application instance” is going to be the stream key you put into OBS.
- Click Create.
- Back at the channel, select the input you just created, then click “Confirm” to attach it to the channel.
- Scroll down to the section which says “Audio selectors” on the newly-attached input settings.
- Click “Add audio selector”.
- Give it a name (I use “default”). Leave “Selector settings” blank.
- On the left, click “Create Channel”.
Step 3: Start the channel
At this point, you have an input and a channel. In the MediaLive control panel, on the left if you click “Inputs”, you should see your input listed with a rtmp:// address under “Destination A” on the right. That’s the URL you’ll put into OBS as the stream URL, all except the last part (the part you entered for “application instance” – strip that off the URL and instead put that last part into “stream key” in OBS.
If you click “Channels”, you’ll see your new channel listed as Idle. To start streaming, select the channel and click “Start”. It will take a few moments to start up. Once it’s ready, after you configure OBS with the RTMP input’s stream URL, you can start streaming.
Step 4: Get the CloudFront HLS URL
Go to the AWS MediaPackage service and select your MediaPackage instance from the list (it’s probably the only one). Click on it to view the details.
In the “Endpoints” section, you should have one endpoint listed. On the right there’s a link which says “Show CloudFront URL”. Copy that URL – it’s the one we want to give VideoJS.
Step 5: Set up the VideoJS player
Now on your website you need to add the VideoJS player. Here’s a basic example:
Replace YOUR-HLS-URL-HERE.m3u8 with the CloudFront URL you copied above.
Teardown
Cloud resources cost money! Don’t forget to stop your MediaLive channel when you’re done streaming. When the channel is stopped, both it and the RTMP input each cost $0.01/hour as idle resources. For my purposes, I usually delete the input and channel since I only stream once a week. To do this, you must first stop and delete the MediaLive channel, and then delete the input (it won’t let you delete the input while it’s attached to the channel).
I leave the MediaPackage and CloudFront resources in place because they are not charged the idle fee (as of this writing).
These AWS services have a lot of configuration options I’ve left out here (and I’m not qualified to talk about most of them), but this walkthrough should get you set up with a decent 720p channel.


